 Tweet
Tweet
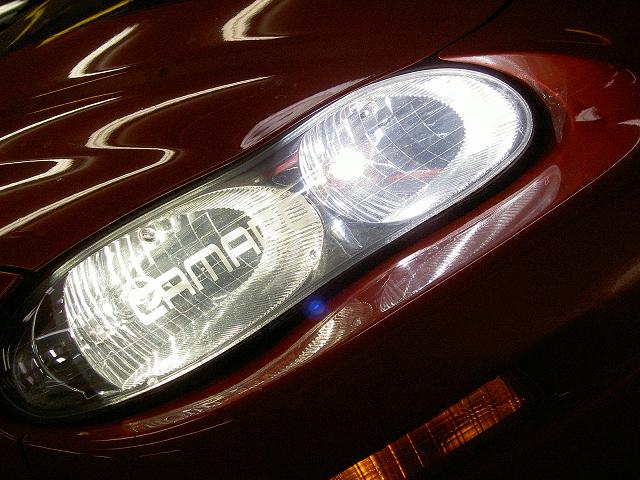
The main purpose of this "How To" describes in detail how to make your 98-02 Camaro's highbeams, lowbeams, and foglights to burn together when the highbeams are selected. This post is a combination from some of my old posts when people asked me how I did it, and from information I've come across on other message boards over the years. Do a search online for the Highbeam mod or Allbeam mod. I decided to make a new thread and see if I can get it Stickied in the "How To" section. My car has been gone for over a year now, so I can't go back and check any of this stuff in person. I do know that I had 7500k or 8000k light temp Xenon/Argon bulbs in the housings.
I've broken this down into two sections. Steps 1-10 are for Highs/Lows on the High setting. Steps 11-26 are for Highs/Fogs on the High setting. You can do either variation of the two, or both together like I did. Your Lowbeams should function as they normally do, even with the fog lights on/off.
I did these modifications on my 1999 Camaro. This might be usable for the 93-97 models, or across platform to the Firebird, but I have no experience or knowledge about this; or even about the wiring of those particular cars.
DISCLAIMER: I take no responsibility for any damages that happen to your car; or pain, or loss experienced by you, your family, your neighbor, or their cat; et al. Do this at your own risk. If your car catches on fire, explodes, or your headlights melt the retinas of oncoming drivers and you get sued.... just remember, I warned you. That said, it worked out fine for me.
---------------------------------------------------------------------------------------
Highs/Lows: This lets the high beams and low beams to burn when the highs are turned on.
1: Remove the four (4) phillips head screws from the plastic cover under the steering column.
2: Next, unplug your trunk/hatch opening button (if equipped).
3: Remove the cover and place it somewhere safe.
4: Then, you'll see a triangular bracket below the steering column held in place with two (2) 13mm nuts (I think).
5: Remove that bracket, and set it to the side somewhere; there might be some wires attached to it with a snap type clip, but it's safe to let it dangle if you lower it slowly.
NOTE: Here's where things get tricky because visibility is low (I needed a flash light, and had to lay down in the seat with the back down, and my head at the pedals). Start looking for a white plastic looking switch with a brown plug (I think). There should be a bunch of wires going into it, and it should be near the base of the column. Click the high beam stalk a few times and you'll see a rod moving on the side of the column, it goes into that switch. You'll know it when you see it move.
6: Press the black tabs in and pull the wiring.
7: Connect the large tan wire and the yellow wire. **Don't cut them**, they have to connect to the switch, you just want them to connect to each other. Use your imagination here, it doesn't matter what you connect em with, just connect em somehow. Maybe you can use a Tap-In clip like I did. I knocked the blocking wall out of one side of the Tap-In, and just ran both wires through it, then clamped down the metal blade into the wires. Do a Google Image search for "Tap-In Connector", since I don't have/own any images to show you.
8: Fire up the highbeams and see if the lows and highs work together on the highbeam setting.
9: Check for fires under your dash....
10: Reinstall all parts in the reverse order of these steps.
---------------------------------------------------------------------------------------
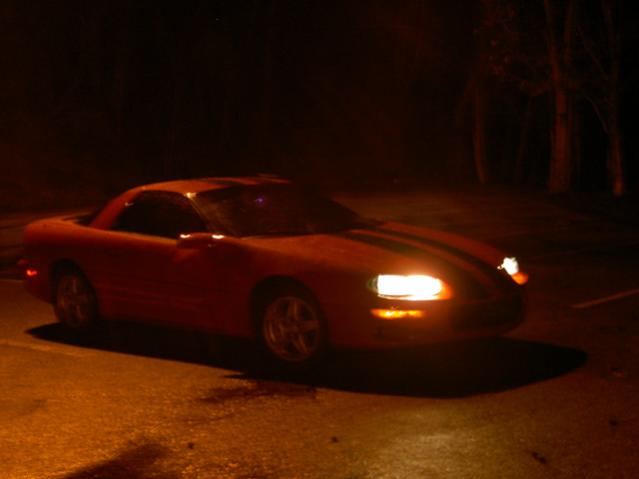
Highs/Fogs: This lets the high beams and fog lights burn when the highs are turned on. These steps can be done seperate from Steps 1-10 if all you're after is fog lights with your high beams. Steps 11-13 detail cutting a wire at the fog light switch. I personally didn't cut the wire there. The only difference that I can gather is that cutting it allows you to switch the fogs on/off when the highbeams are on; I just skipped down to Step 17 (since all I wanted was six forward burning lights), but this does offer more functionality. The following images are representative of what you'll see if you do both sections of this writeup. If you're only doing steps 11-26 (Highs/Fogs only), just use your imagination and pretend the lowbeams are off.

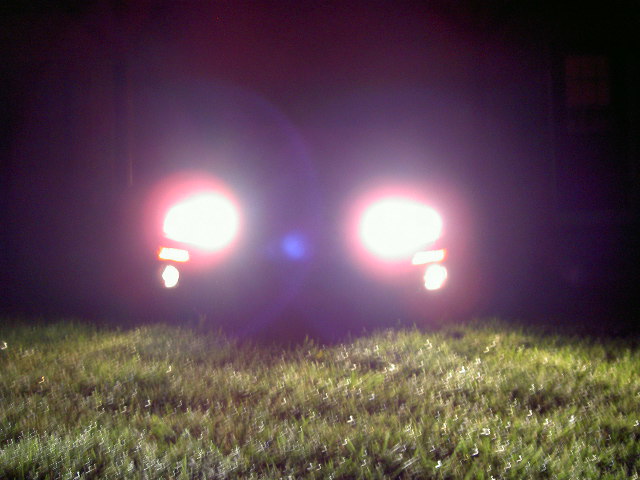
What you see if you are crouched down, looking directly into the lights (it's not as intense for oncoming traffic since they're up higher off the ground):
11: Remove the radio bezel trim. Just get your fingers behind it and pull toward yourself.
12: Unclip the switches from the inside of the bezels, being careful not to break the tabs.
13: Cut the green wire coming out of the back of the fog light switch.
14: If needed, add some wire to the switch side of the green wire, and ground it with one of the radio mount bolts. Don't be cheap, use a ring terminal connector. Do a Google Image search for "Ring Terminal Connector", since I don't have/own any images to show you.
15: Insulate (tape off) the car side of the wire since it is no longer needed and may go hot during the rest of this modification process or when the high beams are on.
16: Put the switch back into the bezel, and the bezel back into the dash. You're done inside the car.
17: Open the hood.
18: Remove the lid to the relay box with the fan and fog relays in it.
19. Locate the fog light relay from the diagram inside the lid.
20. Remove the relay box from the plastic holder (use a flat screw driver to push the tabs in), then flip it over as best you can, so you can see the bottom.
21. Looking into the bottom of the fog light relay you located earlier, you should see the same green wire you worked with inside the car. Cut it (leaving enough room to reach a nearby bolt if possible).
22. Extend the wire coming out of relay box (if needed) with black (or green) wire and ground it to the body of the car. I used the ground screw right next to the relay box, on the strut tower. Don't be cheap, use a ring terminal connector. Do a Google Image search for "Ring Terminal Connector", since I don't have/own any images to show you.
23. Insulate (tape up) the green wire that goes into the wire loom toward the fog light switch. At this point, my understanding says you'll have a green wire just laying in the wire loom which isn't connected to anything on either end. However, I don't know if the wire branches off or picks up any current anywhere else, and was warned that it goes hot with the high beams. Tape it off to be safe.
24. Fire up the highbeams and see if your fogs (and lows if you did the first 10 steps too) are burning together on the highbeam setting.
25. Check for fires under your hood (and dash again).
26. Put everything back together and you are done.
---------------------------------------------------------------------------------------
Pros:
Obviously, way more light at night.
Your more noticable to oncoming traffic, in low light daytime conditions.
Allows you to get revenge on those highbeam blinding jerks in their jeeps and SUVs that never dim the lights for anybody.
Cons:
You miss not having your highbeams on when other cars are coming (used to the light maybe?).
Highbeams in this configuration might make foggy conditions more difficult to drive in.
Might be illegal in some areas, I don't know.
Chance of harming your car, I don't know what kind of strains are put on the electrical system.
I loved it when I had that set up on my 99 Camaro. We live in a rural area, and oncoming traffic is rare after a point, so the extra light is definitely handy. I highly reccomend it, if you're not worried about hacking a wire up, and can deal with the possible cons.
I've broken this down into two sections. Steps 1-10 are for Highs/Lows on the High setting. Steps 11-26 are for Highs/Fogs on the High setting. You can do either variation of the two, or both together like I did. Your Lowbeams should function as they normally do, even with the fog lights on/off.
I did these modifications on my 1999 Camaro. This might be usable for the 93-97 models, or across platform to the Firebird, but I have no experience or knowledge about this; or even about the wiring of those particular cars.
DISCLAIMER: I take no responsibility for any damages that happen to your car; or pain, or loss experienced by you, your family, your neighbor, or their cat; et al. Do this at your own risk. If your car catches on fire, explodes, or your headlights melt the retinas of oncoming drivers and you get sued.... just remember, I warned you. That said, it worked out fine for me.
---------------------------------------------------------------------------------------
Highs/Lows: This lets the high beams and low beams to burn when the highs are turned on.
1: Remove the four (4) phillips head screws from the plastic cover under the steering column.
2: Next, unplug your trunk/hatch opening button (if equipped).
3: Remove the cover and place it somewhere safe.
4: Then, you'll see a triangular bracket below the steering column held in place with two (2) 13mm nuts (I think).
5: Remove that bracket, and set it to the side somewhere; there might be some wires attached to it with a snap type clip, but it's safe to let it dangle if you lower it slowly.
NOTE: Here's where things get tricky because visibility is low (I needed a flash light, and had to lay down in the seat with the back down, and my head at the pedals). Start looking for a white plastic looking switch with a brown plug (I think). There should be a bunch of wires going into it, and it should be near the base of the column. Click the high beam stalk a few times and you'll see a rod moving on the side of the column, it goes into that switch. You'll know it when you see it move.
6: Press the black tabs in and pull the wiring.
7: Connect the large tan wire and the yellow wire. **Don't cut them**, they have to connect to the switch, you just want them to connect to each other. Use your imagination here, it doesn't matter what you connect em with, just connect em somehow. Maybe you can use a Tap-In clip like I did. I knocked the blocking wall out of one side of the Tap-In, and just ran both wires through it, then clamped down the metal blade into the wires. Do a Google Image search for "Tap-In Connector", since I don't have/own any images to show you.
8: Fire up the highbeams and see if the lows and highs work together on the highbeam setting.
9: Check for fires under your dash....
10: Reinstall all parts in the reverse order of these steps.
---------------------------------------------------------------------------------------
Highs/Fogs: This lets the high beams and fog lights burn when the highs are turned on. These steps can be done seperate from Steps 1-10 if all you're after is fog lights with your high beams. Steps 11-13 detail cutting a wire at the fog light switch. I personally didn't cut the wire there. The only difference that I can gather is that cutting it allows you to switch the fogs on/off when the highbeams are on; I just skipped down to Step 17 (since all I wanted was six forward burning lights), but this does offer more functionality. The following images are representative of what you'll see if you do both sections of this writeup. If you're only doing steps 11-26 (Highs/Fogs only), just use your imagination and pretend the lowbeams are off.
What you see if you are crouched down, looking directly into the lights (it's not as intense for oncoming traffic since they're up higher off the ground):
11: Remove the radio bezel trim. Just get your fingers behind it and pull toward yourself.
12: Unclip the switches from the inside of the bezels, being careful not to break the tabs.
13: Cut the green wire coming out of the back of the fog light switch.
14: If needed, add some wire to the switch side of the green wire, and ground it with one of the radio mount bolts. Don't be cheap, use a ring terminal connector. Do a Google Image search for "Ring Terminal Connector", since I don't have/own any images to show you.
15: Insulate (tape off) the car side of the wire since it is no longer needed and may go hot during the rest of this modification process or when the high beams are on.
16: Put the switch back into the bezel, and the bezel back into the dash. You're done inside the car.
17: Open the hood.
18: Remove the lid to the relay box with the fan and fog relays in it.
19. Locate the fog light relay from the diagram inside the lid.
20. Remove the relay box from the plastic holder (use a flat screw driver to push the tabs in), then flip it over as best you can, so you can see the bottom.
21. Looking into the bottom of the fog light relay you located earlier, you should see the same green wire you worked with inside the car. Cut it (leaving enough room to reach a nearby bolt if possible).
22. Extend the wire coming out of relay box (if needed) with black (or green) wire and ground it to the body of the car. I used the ground screw right next to the relay box, on the strut tower. Don't be cheap, use a ring terminal connector. Do a Google Image search for "Ring Terminal Connector", since I don't have/own any images to show you.
23. Insulate (tape up) the green wire that goes into the wire loom toward the fog light switch. At this point, my understanding says you'll have a green wire just laying in the wire loom which isn't connected to anything on either end. However, I don't know if the wire branches off or picks up any current anywhere else, and was warned that it goes hot with the high beams. Tape it off to be safe.
24. Fire up the highbeams and see if your fogs (and lows if you did the first 10 steps too) are burning together on the highbeam setting.
25. Check for fires under your hood (and dash again).
26. Put everything back together and you are done.
---------------------------------------------------------------------------------------
Pros:
Obviously, way more light at night.
Your more noticable to oncoming traffic, in low light daytime conditions.
Allows you to get revenge on those highbeam blinding jerks in their jeeps and SUVs that never dim the lights for anybody.
Cons:
You miss not having your highbeams on when other cars are coming (used to the light maybe?).
Highbeams in this configuration might make foggy conditions more difficult to drive in.
Might be illegal in some areas, I don't know.
Chance of harming your car, I don't know what kind of strains are put on the electrical system.
I loved it when I had that set up on my 99 Camaro. We live in a rural area, and oncoming traffic is rare after a point, so the extra light is definitely handy. I highly reccomend it, if you're not worried about hacking a wire up, and can deal with the possible cons.
Attached Files


Comment