 Tweet
Tweet
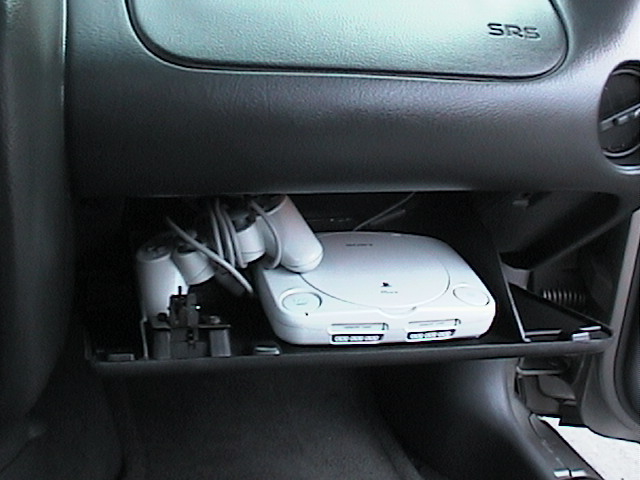
PlayStation 1 and TV Tuner
First I will explain the all the power connections, then I will explain all the AV connections, then I will give my review.
POWER CONNECTION
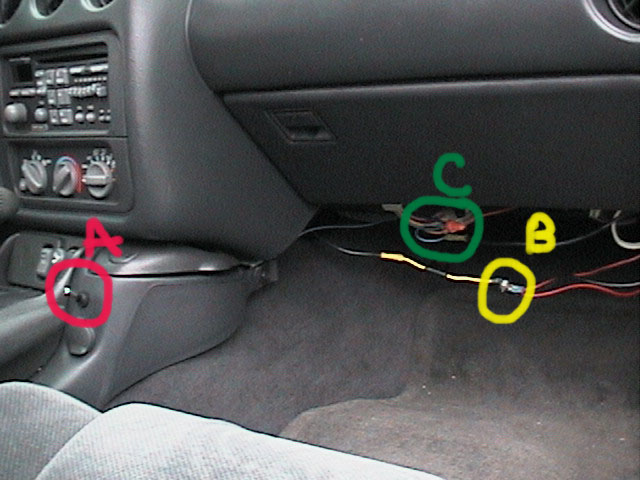
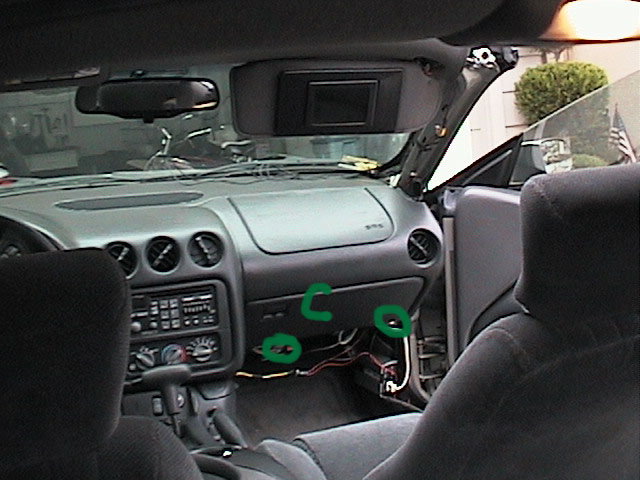
Connection A This is the switch connection. The switch has three prongs, the ground, hot wire, and the accessory wire. The switch in this application is only used to tun on the PS1, since it is powered by an inverter that I didn't want always on. But for other applications, the switch can also simultaneously be used for other devices. The + prong on the switch is connected straight to the battery, in order to give a constant power. Spliced into the hot wire before the switch is the + for the screen and the TV tuner. I did this because the screen has an automatic signal detecting switch, and the TV tuner has a power button on the remote control. The TV tuner also requires a constant power in order to save the channel memories, and the setting for the Fm-modulator.
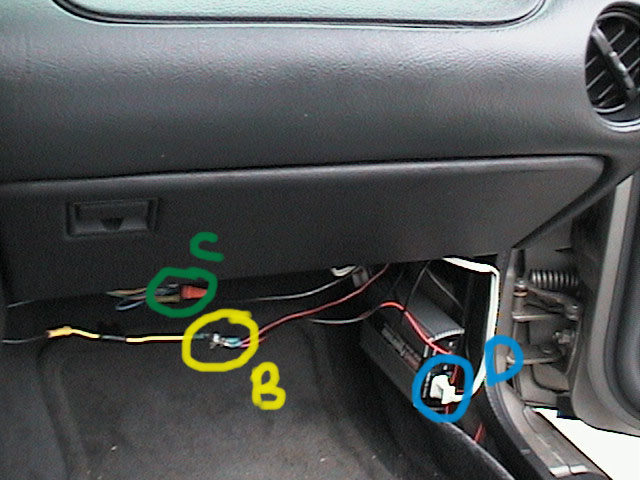
The Accessory prong is connected to the inverter + wire (Connection B)
The ground prong is connected to the cars ground at Connection C.
( The picture shows two wire at connection B, because at this time I had the screen powered by the switch.)
Connection C At this connection I have all the ground wire connected to the cars ground. On the picture below I circle an area on the pic on the far right, this is the factory ground terminal I used to ground out all my components.
Connection D This connection is one of the most difficult. My electrical engineering abilities are limited, so I just bought a converter to change the violate from 12V up to 220V then into the PS1 converter down to something like 9 volts. When I bought the converter I did not realize that I could get a car adapter plug for the PS1. So this design will be changing. But I will explain for anyone who might want to use a inverter.
I found a great place to put the inverter is behind the passenger kick panel, behind the kick panel is a rubber/plastic cross the is designed to support the kick panel. I used a razor and cut it out, and placed the Inverter there. I have had no problems from overheating, and it works fine. In order to get the power to the PS1, I had to use an extension cord because I couldn't fit the PS1 converter plug in that small area. SO i too a 3 foot extension cord and cut it down to 6 inches, soldered it together, and taped it up. Then I was able to pug it all together and hide it up behind the glove box.
AUDIO/VIDEO
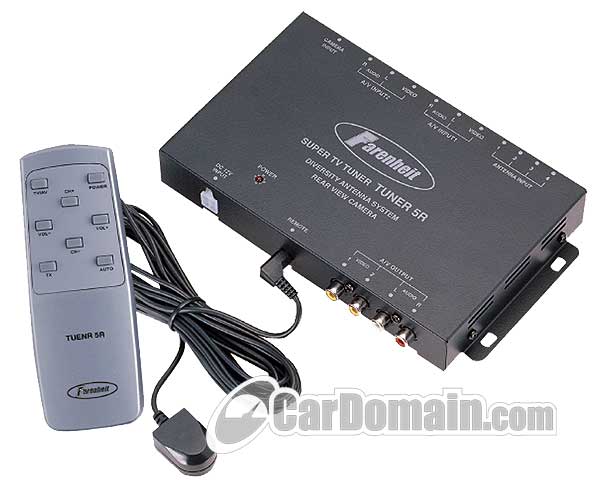
TV-Tuner This TV tuner does a little more than just a TV-tuner. It also acts as a input selector and an FM modulator. It has to AV inputs and a third for a back up cam. It also has a FM-modulator. This is good for me because I don't want to to change the head unit right now.
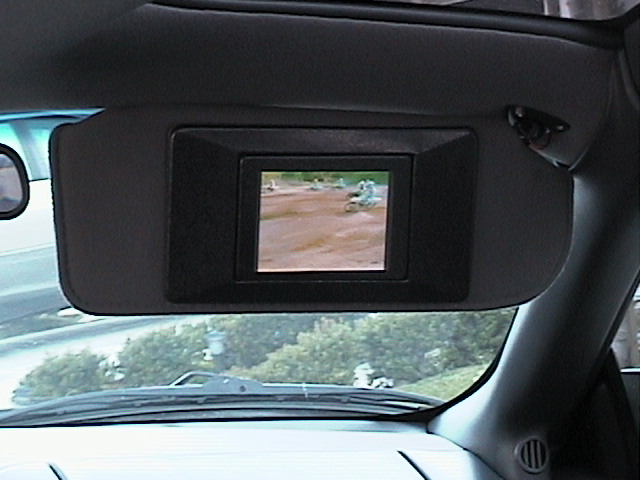
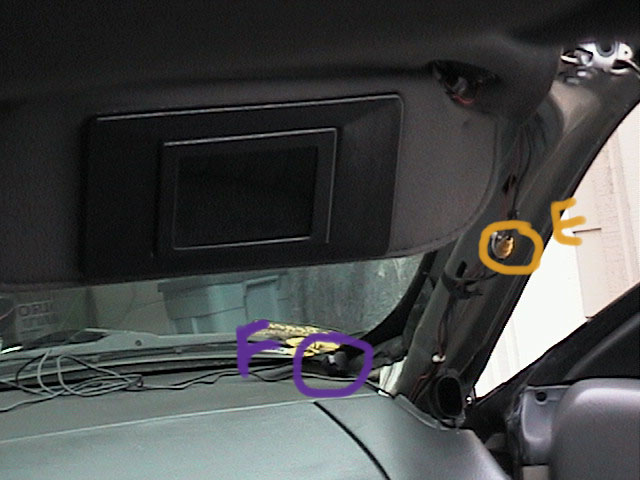
Connection E This is the first connection for the video. This is the input video wire for the screen. I runs all the way back down the side of the car and behind the interior to the area behind the rear passenger sail panel speaker. Here it connect to the TV tuner Video output.
Connection F This is the remote eye for the remote control of the TV-tuner. I mounted the eye in the corner of my dash at the base of the A-pillar. I have to have a parking sticker there for school, so it blends in nicely in the corner. This connection runs back to the TV tuner and makes a connection Between H and I.
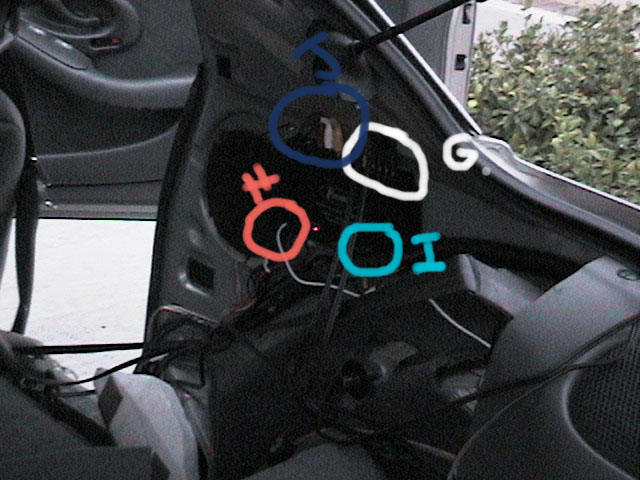
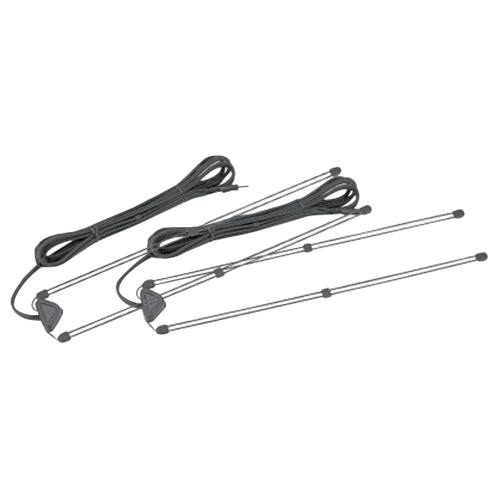
Connection G This is the connection for the 4-way diversity antennas. I have mine mounted behind the plastic interior pieces that line the upper hatch window. For reception the Higher the better. This was logically the highest point on the car. They run the entire width of the top of the hatch and come down about half way down the sides. They are completely hidden from view. They use 4-1/8 mini jack plugs.
Connection H This is where the the FM-Modulator function of the device comes into play. Basically how it works is that I can use and on screen menu to choose th frequency of transmittal. The frequency exits through this antenna wire. I capped the end of the wire with terminal hoop, and attached it to the second terminal post on the Car antenna base. On my power antenna, there is a terminal where the signal travels into a wire that goes to the HU. On the same bracket there is a second one, I just found a nut and bolt and connected the FM modulator antenna here.
Connection I This is the TV-tuner output is and the Screen input is plugged into.
Connection J This is the AV1 input for the PS. Just connect the PS1 output into this jack.
[ March 06, 2004, 01:25 PM: Message edited by: Stefan ]
First I will explain the all the power connections, then I will explain all the AV connections, then I will give my review.
POWER CONNECTION
Connection A This is the switch connection. The switch has three prongs, the ground, hot wire, and the accessory wire. The switch in this application is only used to tun on the PS1, since it is powered by an inverter that I didn't want always on. But for other applications, the switch can also simultaneously be used for other devices. The + prong on the switch is connected straight to the battery, in order to give a constant power. Spliced into the hot wire before the switch is the + for the screen and the TV tuner. I did this because the screen has an automatic signal detecting switch, and the TV tuner has a power button on the remote control. The TV tuner also requires a constant power in order to save the channel memories, and the setting for the Fm-modulator.
The Accessory prong is connected to the inverter + wire (Connection B)
The ground prong is connected to the cars ground at Connection C.
( The picture shows two wire at connection B, because at this time I had the screen powered by the switch.)
Connection C At this connection I have all the ground wire connected to the cars ground. On the picture below I circle an area on the pic on the far right, this is the factory ground terminal I used to ground out all my components.
Connection D This connection is one of the most difficult. My electrical engineering abilities are limited, so I just bought a converter to change the violate from 12V up to 220V then into the PS1 converter down to something like 9 volts. When I bought the converter I did not realize that I could get a car adapter plug for the PS1. So this design will be changing. But I will explain for anyone who might want to use a inverter.
I found a great place to put the inverter is behind the passenger kick panel, behind the kick panel is a rubber/plastic cross the is designed to support the kick panel. I used a razor and cut it out, and placed the Inverter there. I have had no problems from overheating, and it works fine. In order to get the power to the PS1, I had to use an extension cord because I couldn't fit the PS1 converter plug in that small area. SO i too a 3 foot extension cord and cut it down to 6 inches, soldered it together, and taped it up. Then I was able to pug it all together and hide it up behind the glove box.
AUDIO/VIDEO
TV-Tuner This TV tuner does a little more than just a TV-tuner. It also acts as a input selector and an FM modulator. It has to AV inputs and a third for a back up cam. It also has a FM-modulator. This is good for me because I don't want to to change the head unit right now.
Connection E This is the first connection for the video. This is the input video wire for the screen. I runs all the way back down the side of the car and behind the interior to the area behind the rear passenger sail panel speaker. Here it connect to the TV tuner Video output.
Connection F This is the remote eye for the remote control of the TV-tuner. I mounted the eye in the corner of my dash at the base of the A-pillar. I have to have a parking sticker there for school, so it blends in nicely in the corner. This connection runs back to the TV tuner and makes a connection Between H and I.
Connection G This is the connection for the 4-way diversity antennas. I have mine mounted behind the plastic interior pieces that line the upper hatch window. For reception the Higher the better. This was logically the highest point on the car. They run the entire width of the top of the hatch and come down about half way down the sides. They are completely hidden from view. They use 4-1/8 mini jack plugs.
Connection H This is where the the FM-Modulator function of the device comes into play. Basically how it works is that I can use and on screen menu to choose th frequency of transmittal. The frequency exits through this antenna wire. I capped the end of the wire with terminal hoop, and attached it to the second terminal post on the Car antenna base. On my power antenna, there is a terminal where the signal travels into a wire that goes to the HU. On the same bracket there is a second one, I just found a nut and bolt and connected the FM modulator antenna here.
Connection I This is the TV-tuner output is and the Screen input is plugged into.
Connection J This is the AV1 input for the PS. Just connect the PS1 output into this jack.
[ March 06, 2004, 01:25 PM: Message edited by: Stefan ]


Comment